Home » 3D Studio

Category: 3D Studio

Can You Tell the Difference?

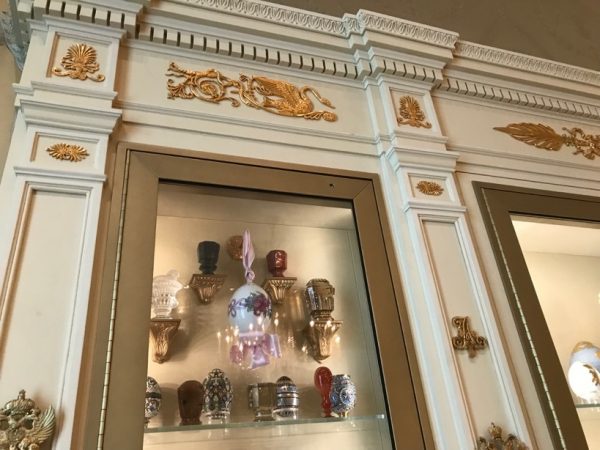
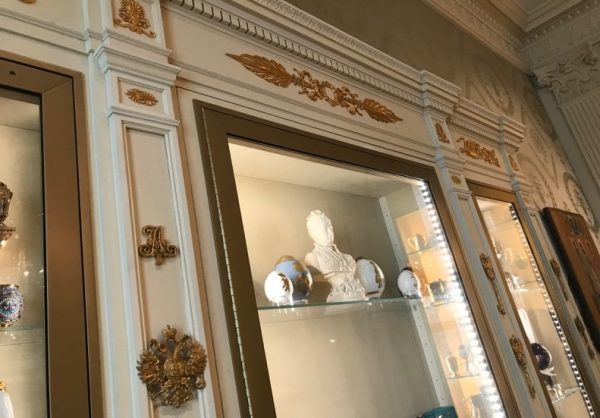
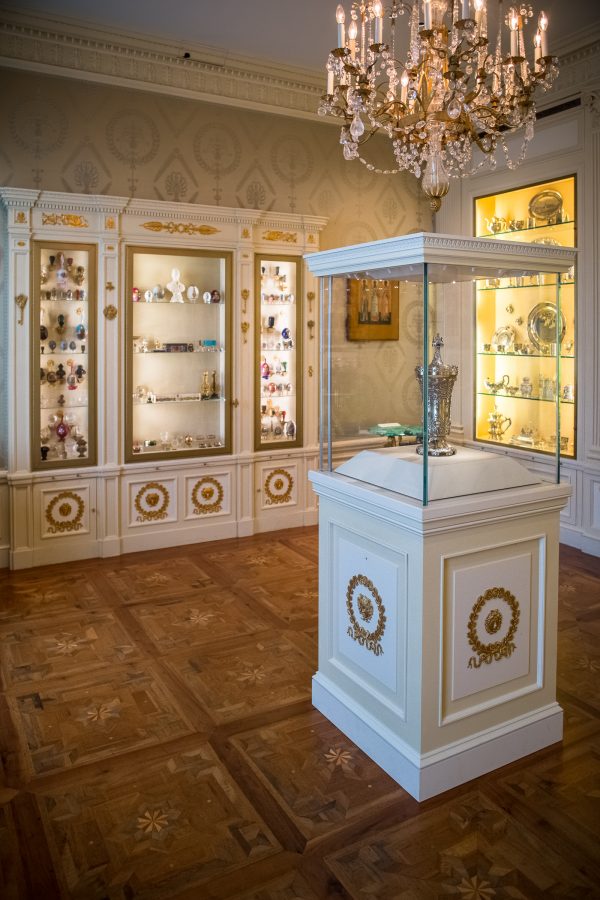
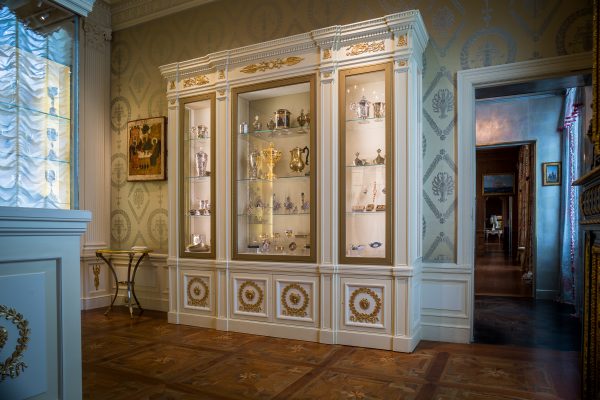
In 1955, businesswoman, philanthropist, and collector Marjorie Merriweather Post (1887–1973) purchased the Hillwood Estate in Northwest Washington, D.C. Post directed her architects and designers to refurbish the 1920s neo-Georgian mansion into a nobler residence that would function as a fully staffed home as well as a showcase for her sophisticated collections of late eighteenth-century French and Imperial Russian décor.

Today, visitors from around the world can experience the Hillwood Estate and explore the awe-inspiring mansion, museum, and thirteen acres of formal gardens that continue to display Marjorie Merriweather Post’s charming array of collections: a tasteful and true legacy that she left behind.


The Hillwood mansion


Hillwood’s formal gardens

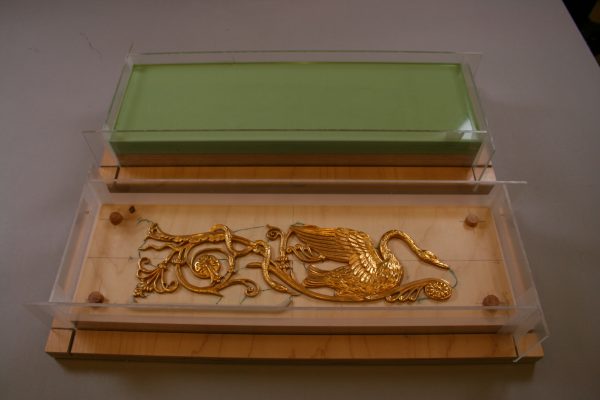
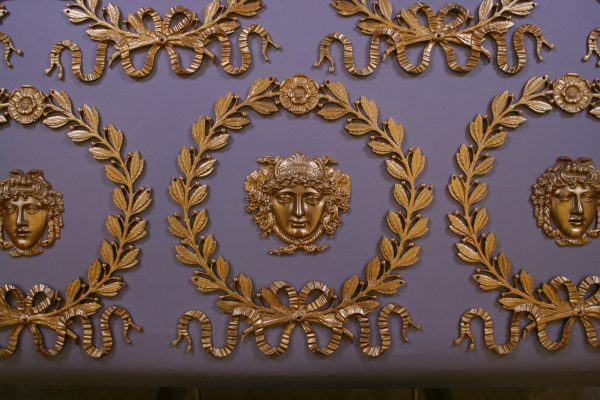
When the Hillwood Estate, Museum, and Gardens approached Smithsonian Exhibits (SIE) to recreate a number of decorative elements for a newly constructed display case, we jumped at the challenge. The sign of a good replica is that you can’t tell the difference from the original. At Smithsonian Exhibits, that is exactly what the sculptors and model makers aim to achieve. Project Manager Seth Waite and Exhibits Specialists Danny Fielding, Chris Hollshwander, and Carolyn Thome worked on the project for SIE.

After doing some research, Seth discovered that the hardware company and metal foundry that made the original decorative elements—P.E. Guerin, established in New York in 1857—was still in business. Hillwood considered working with the company to recreate the elements using their traditional metal casting techniques, but ultimately decided to go with SIE’s traditional approach using more modern materials.

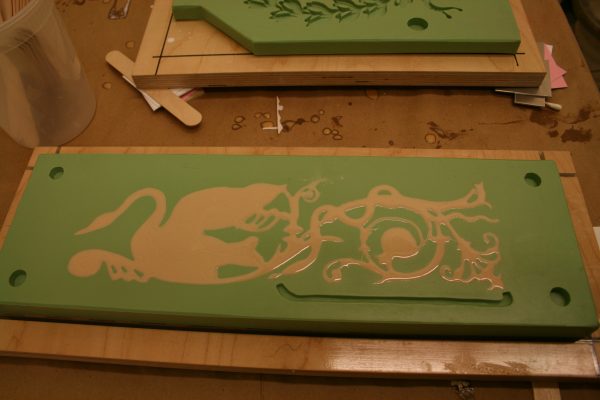
On any project, the first step is to determine the client’s needs and decide which methods and approaches will work best to meet them. When recreating the decorative elements for Hillwood, SIE carefully considered a variety of manufacturing methods, eventually deciding that Danny would mold and cast the pieces himself. Once this decision was made, the next step was to select the best materials to use to create the most faithful and durable replicas for Hillwood. After testing the compatibility of several materials and carefully preparing the molds, SIE’s experts then proceeded with production.


Mold preparation- Front
Mold preparation in process


Production molds for each original piece


Open pour resin casting
Resin is poured into one of the molds to create a cast.


Raw resin casts ready for finishing


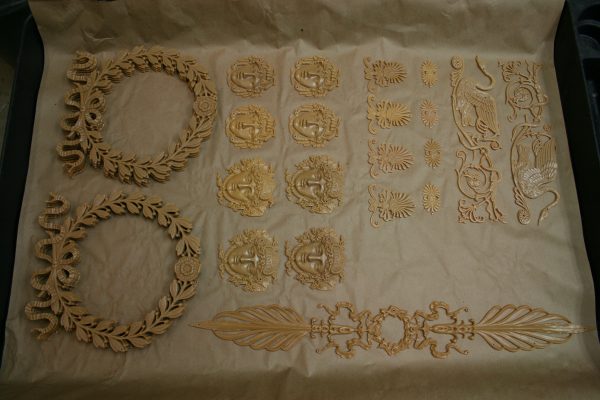
Finally, Carolyn created a finish that closely matched the originals.


Smithsonian Exhibits finished replicas
SIE’s finished replicas


Smithsonian Exhibits finished replicas
SIE’s finished replicas


Smithsonian Exhibits finished replicas
SIE’s finished replicas


Can you tell the difference between the original and the replica? (The answer is at the end of the post.)


Original pieces adorning Hillwood’s traditional collections case
The historic display case with its original decorative elements


Original pieces adorning Hillwood’s traditional collections case
The historic display case with its original decorative elements


Finished elements created by SIE mounted on Hillwood’s new collections case
The new display cases with the replica decorative elements created by SIE


Finished elements created by SIE mounted on Hillwood’s new collections case
The new display cases with the replica decorative elements created by SIE


While this only skims the surface, hopefully it gives you a better idea of the multifaceted steps that go into replicating artifacts. The next time that you’re admiring a work of art—original or a replica—take a moment to study the craftsmanship of the piece. The artistry and attention to detail that go into the process is truly awe-inspiring.

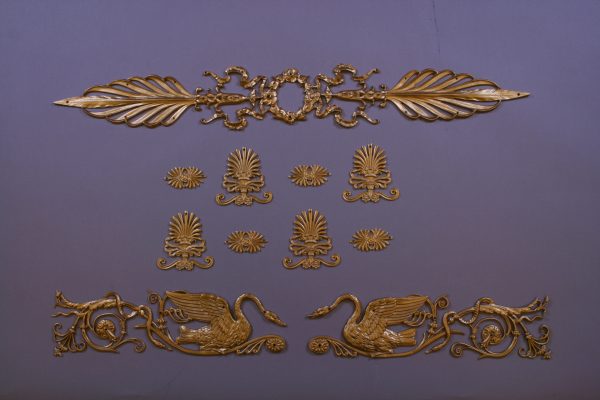
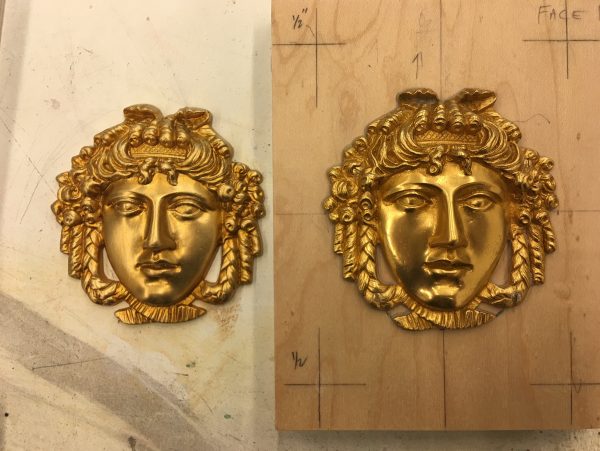
So, were you able to tell the difference between the original and the replica in the photo above? (The replica is on the left and the original is on the right.)

Unwrapping the Cosmic Buddha

The intricate images that cover this monumental standing Buddha are very difficult to see. Traditionally, scholars have made rubbings with black ink on white paper to study such low-relief carvings. But digital scanning and CNC milling make another approach possible.

Curator Keith Wilson asked OEC to create a touchable model of the details on this Chinese limestone figure, known as the Cosmic Buddha. They provide a rare glimpse into early Chinese visions of the Buddhist world, a kind of symbolic map depicting a cosmos with an infinite number of realms. Traces of pigment on the surface suggest that the dense design was originally painted, which would have made the scenes easier to perceive.

The 3D Digitization Office provided hi-res images of an “unwrapped” view of the Buddha—that is, with the details laid out flat instead of “in the round.” OEC model maker Chris Hollshwander then ran the scans through specialized software to prepare them for the Haas CNC Mill. The CNC Mill can work with a wide variety of materials, so Hollshwander experimented, machining 3D models out of polyurethane board and aluminum. This technique can be used to create touchable models of any scannable object in the Smithsonian collections.

The finished model serves as a case study for how to translate 3D scans into “unwrapped” touchable models that can be used for research and education in a variety of ways: to provide hands-on learning opportunities for low-vision visitors in the galleries, or for teaching rubbing techniques to new scholars. Wilson plans to use multiple copies for experimenting with the application of pigment, to explore ideas about the figure’s original appearance.


Cosmic Buddha

Left to right: The Cosmic Buddha Buddha Vairochana (Pilushena) with the Realms
of Existence China, probably Henan province, Northern Qi dynasty, 550–77, Limestone
with traces of pigment, Freer Gallery of Art; Shoulder detail; Traditional ink
rubbing; 3D scan
Images2

Flattened or “unwrapped” digital view with scene divisions indicated; Haas CNC Mill at work milling the Buddha out of synthetic board
Cosmic Buddha relief models

Left to right: synthetic board and aluminum models of the unwrapped Buddha

Thanks to contributors Keith Wilson, Curator of Ancient Chinese Art, Freer Gallery of Art/Arthur M. Sackler Gallery; Chris Hollshwander, Model Maker, Office of Exhibits Central


OEC at the Staff Picnic in Rain and Shine

Undeterred by intermittent showers, OEC staff shared their work with the greater Smithsonian
community. It was a chance to connect with other exhibit and museum
professionals. Even the Secretary stopped by to say hi.


SI picnic Image 1

The OEC Model Shop showcased the ability of its 3D scanning and printing technology with a range of
3D-printed models.


SI picnic Image 2

OEC brought an assortment of low-tech interactive exhibits to talk about exhibition design and fabrication. The mailbox in the foreground allowed visitors to read historic postcards for the exhibit Mail Call.


SI picnic Image 3

The OEC Graphics Shop featured the capabilities of its direct-to-surface printer, which can print on a wide variety of substrates, including acrylic, metal, corrugated plastic, MDF panel, and seat cushion (all pictured).


SI picnic Image 4

Jia-Sun Tsang, of the Smithsonian’s Museum Conservation Institute, discusses the green conservation-grade exhibit cases that were developed in partnership with OEC.


An Indoor Tree for Orchids of Latin America

A lifelike Banyan tree recalls the tropical rainforest
at the National Museum of Natural History.

Orchids
of Latin America
(Natural History, January 26-April 21, 2013) explored
the crossroads of botany, horticulture, and culture. Exhibit planners wanted to
transport visitors to the tropical rainforest, so they requested a dramatic Banyan
tree sculpture at the exhibit entrance to evoke the orchids' lush habitat. Orchids has since closed, but the tree
remains at NMNH.

Designing, making, and installing a life-sized
tropical tree required careful planning by OEC’s Model Shop. The tree was made
in sections to allow for transport and delivery through the hallways at NMNH.

Modelmakers began by building
a welded armature trunk with removable branches. They then applied fire-rated urethane
foam and carved it into shape. Next, trunk and branches were coated with a
water-based, pliable material that would hold a texture and harden. Modelmakers
sculpted strangler fig vines on top of the trunk, and stained both with color. The
entire structure was transported to NMNH, where modelmakers attached branches,
adjusted leaves, and painted the surface to make the Banyan tree appear a
seamless whole.


Banyan tree model covered with foam

The tree’s metal armature skeleton is covered with blocks of urethane foam.
Taking a mold of tree bark

Modelmakers Erin Mahoney and Megan Dattoria make a mold of living tree bark at the Kogod Courtyard.
Painted Banyan trunk

The painted Banyan trunk with strangler fig vines.
12-opening

The completed Banyan tree greets visitors at NMNH.

Time and Navigation and a Dog

When the National Air and Space
Museum needed a very special dog,
they turned to OEC’s Model Shop.
 

In 1839, Charles Wilkes led the
U.S. Exploring Expedition into Antarctic waters, accompanied by a large
Newfoundland named Sydney. For the exhibition “Time and Navigation: The Untold
Story of Getting from Here to There
,” NASM planned a diorama of Wilkes’s cabin.
Naturally they wanted to include Sydney.

NASM asked the Model Shop for a
sculpture, to be based on Sir Edwin Landseer’s 1831 dog painting A Distinguished Member of the Humane Society.
(Fun fact: This breed of black and white Newfoundland is now called Landseer
Newfoundland, after the painting.)

OEC modelmakers began with an
armature of wire and Styrofoam. Lora Collins (Model Shop supervisor and chief
sculptor) then piled on the clay and sculpted a lifelike, full-scale dog
portrait. When the sculpture is done, modelmaker Chris Hollshwander will make a
mold of the piece in silicone rubber. The mold will then go to a metal foundry,
and a bronze cast of Sydney will be produced, finished with a black and white
patina to match the coloring of the breed.


NEWF1

Stage 1: A basic dog shape in foam and wire. On the wall,
a print of Landseer’s A Distinguished Member of the Humane Society serves as a model, along with photos of less famous Newfoundlands.


NEWF2

Stage 2: With clay applied over the wire armature, the sculpture starts to look more realistic.


NEWF3

Modelmaker Carolyn Thome (right) brought in her dog for a day of live modeling. Not the same breed, but her presence helped Lora to give life to the figure. In the background, Lora Collins and Erin Mahoney.


NEWF4
Stage 3: Sculptor Lora Collins adds detail.


NEWF5

Lora Collins works on a paw. As details of fur and expression are added, Sydney’s personality emerges


Ready for the mold

Ready for his close-up! The clay model is finished and all set for mold-making.


Bracketing Snowboards Isn’t Easy

A new case display about snowboarding opened up at the National Museum of American History this month. The exhibit briefly traces the history/evolution of the snowboard from its beginning to current style. Objects on display in the Snowboard Exhibit include Shaun White's Snowboard and Snowboarding outfit (Coat and Pants), a pair of Hannah Teter's boots, and examples of early snowboards, known as "Snurfer's".

Senior model maker Jon Zastrow was called on by the NMAH exhibit team to fabricate brackets for the snowboards on display. He devised an ingenious bracket that is adjustable on three axes of rotation, which greatly simplified the process of tweaking the the object's positioning during the install. This was particularly important because Jon didn't have access to the snowboards until he went on site.

Prototype Bracket-IMG_6741-reduced

Above: Prototype bracket

Although this exhibit consists of only one case, the success of the installation required fast response and effective collaboration between American History's team and OEC, due to a very tight deadline. The results speak for the high quality of each team member's contribution.

The Snowboard Exhibit is on the 1st floor on the American History Museum (Constitution Ave. Entrance) in the Far Right corner (Near the gift Shop) and will be on display at least through Winter 2013.


Case

Above: The final installation 

Secretary Clough Comes to OEC

Secretary Wayne Clough paid a visit to OEC last week to view the production process of the latest Museum on Main Street exhibit: The Way We Worked.  The exhibit was developed by MoMS and is based on a collection of photographs from the National Archives. The Way We Worked takes a close look at the important role work plays in American lives and how our workforce has changed over time.  Five copies of the exhibit were produced at OEC and began shipping out to small towns across America at the end of August.

Being from a small town himself, the Secretary spoke about how important cultural programing like traveling exhibitions are for rural Americans. He also mentioned how impressed he was with OEC’s handiwork. It was a pleasure to share our work with the Secretary and an exciting way to wrap up the production of another terrific MoMS exhibit. 

IMG_1701

Robbie Davis of MoMS assembles TWWW in preparation for the Secretary's visit. 
 
IMG_1709

Secretary Clough viewing TWWW.

IMG_1812

Secretary Clough poses for a photo at the entrance of TWWW.

IMG_1789

Secretary Clough talking with modelmakers Jon Zastrow and Danny Feilding about the fabrication process of TWWW. 

Uncle Beazley Has Arrived

 6a00d834562f3e69e20147e2cff9ef970b-800wi 
Last Wednesday OEC welcomed a life sized fiberglass triceratops to our place of work. This dino, Uncle Beazley, currently resides at the National Zoo but will be our guest for the next few weeks.
Uncle Beazley has been in need of periodic upkeep and repairs over the many years he’s belonged to SI, and the OEC model shop has been the primary provider of these services. Instead of just patching him up again and working outside as we have always done, we wanted to utilize the new space we have here at Pennsy Drive and do a more thorough refurbishing of this dear old fiberglass beast. With LOTS of coordination and support from transportation, horticulture, the Zoo and building services, we managed to bring him over to Pennsy last week.
After he was thoroughly power washed and cleaned, we brought him into the building, which was very tricky because at 27 feet long, 9 feet wide and 9 feet high, he is at the upper limits of size for moving him around and through the hallways! Now that he is in our shop we are patching holes and cracks and we will soon apply an entirely new coat of UV and weather resistant paint. We’ll refer to early photos of him to try to match what he originally looked like. We hope to have repairs done and Uncle Beazley ready for return to the Zoo by mid March. Carolyn Thome is the model maker responsible for doing this work; and many, many others have helped make this possible!

6a00d834562f3e69e20147e2cff4cc970b-800wi[1] 

6a00d834562f3e69e20147e2cff6ae970b