Home » Exhibit Design

Category: Exhibit Design

Conquering the Panda Challenge

Sometimes developing exhibits can feel like a maze, with many different directions to explore and challenges to overcome. Recently, Smithsonian Exhibits (SIE) was asked to build a real maze for the Panda House at Smithsonian’s National Zoo and Conservation Biology Institute (NZP). The purpose of the interactive is for visitors to guide a panda through the bamboo forests of China, avoiding problem areas, such as fragmented habitat, construction, and deforestation. The maze is intended to show visitors of all ages the rapidly growing challenges that pandas face every day when traveling through bamboo forests seeking food, shelter, and looking for a mate.


Zoo sign and flower bed at the entrance to Smithsonian's National Zoo
Smithsonian’s National Zoo. Courtesy of Mehgan Murphy, Smithsonian’s National Zoo


Since SIE fabricator Enrique Dominguez had worked on a similar project in a previous job, it was decided that his experience would make for smooth development on this project. Starting with the design, Enrique created drawings on a computer platform that allowed him to make changes and flesh out details quickly. Then the team needed to figure out where the “positive” and “negative” areas of the maze would be. Enrique designed the maze so that the ball would keep rolling freely down the green pathways, but visitors would have to turn the wheel completely to release the ball when it got stuck in the problem areas. This design avoids the issue of having to reset the maze before each use.

Enrique created a cardboard cutout of the wheel with all of its graphics to show the Zoo the concept and scale. Then he created a maze pattern, which he 3D routed so that it could be held and played to resemble how the finished maze would actually look and feel.


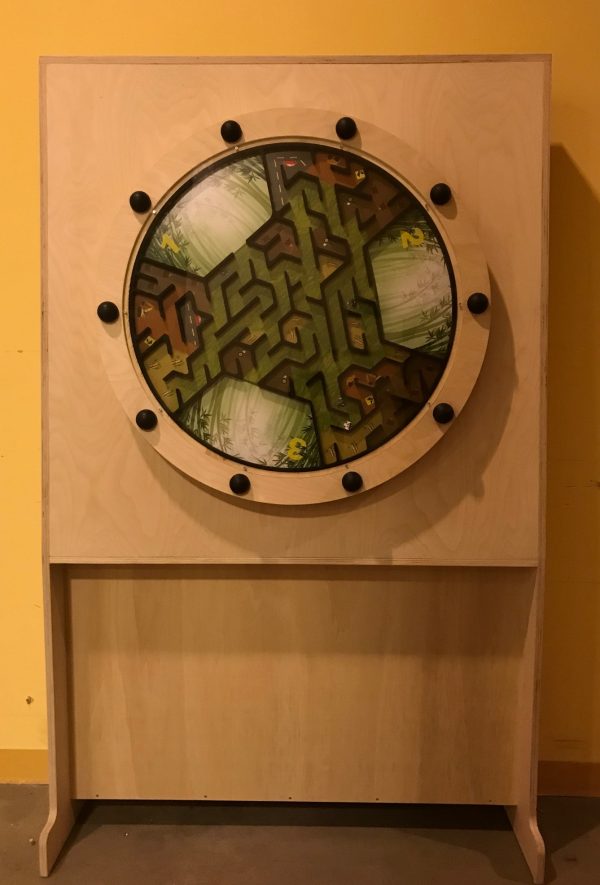
Wooden structure with a wheel at the center containing a maze
The prototype for the panda maze


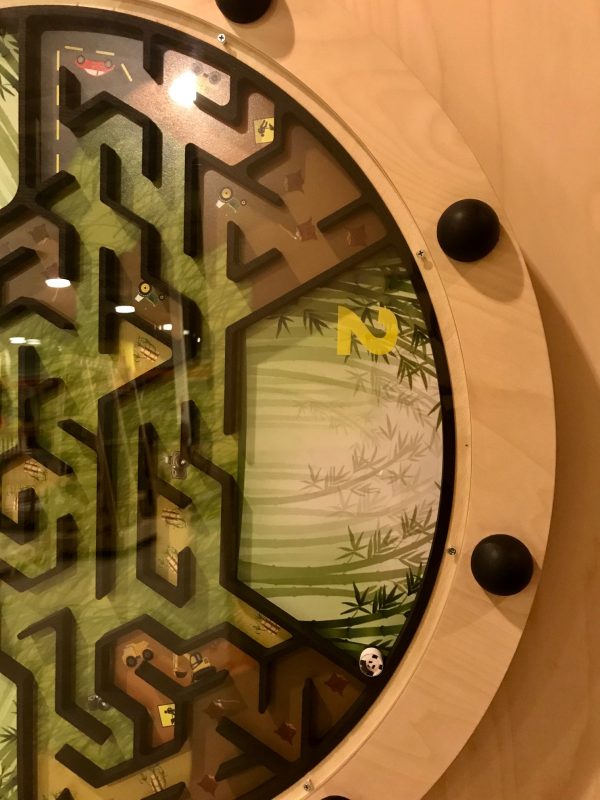
A close-up of the maze, showing details of the graphic, including bamboo leaves, tractors, cars, and construction signs
The prototype of the maze included placeholder graphics depicting hazards, such as deforestation, roads, construction, and farming, which the panda must avoid to reach the bamboo forest.


When selecting materials, Enrique wanted to keep handles to a minimum, so that kids playing with the maze could not hold on and hang from the exhibit. By using short, rounded handles and placing a bearing on the back of the wheel, the maze essentially has a brake to stop it from spinning on and on. Finally, after getting the client’s approval, the final prototype was built and its durability was put to the test when a number of children played with it.

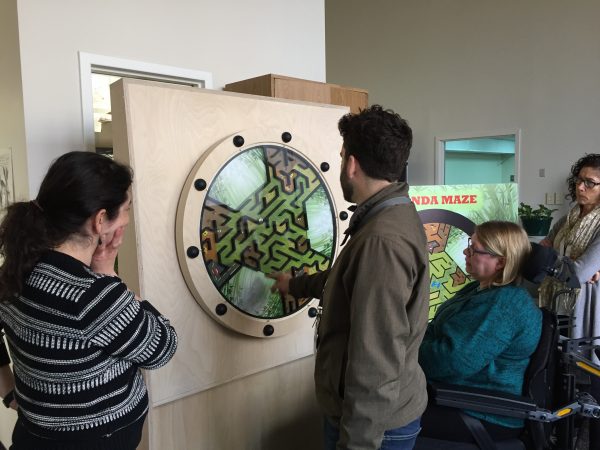
Following the rapid prototyping phase, SIE and NZP met with Beth Ziebarth, Director of Access Smithsonian, who tested the interactive to make sure that it met all standards of the Americans with Disabilities Act and was accessible for all individuals.


A group of four people surround the Panda Maze prototype. Three are standing and one is in a wheelchair.
SIE, NZP, and Beth Ziebarth, Director of Access Smithsonian, test the interactive.


The next step will be to fabricate and install the interactive at the Zoo’s Panda House. The maze will be built by SIE’s fabrication experts to withstand wear and tear from interaction for years to come. Look for the final maze at the Zoo later this fall.

Hometown Teams and Visualizing Exhibits

Hometown Teams: How Sports Shape America explores the ways in which sports affect American culture. The exhibit was curated by Museum on Main Street and designed, edited and fabricated by the Office of Exhibits Central. OEC prepared five copies of Hometown Teams, which will tour the United States and territories over the next five years.

Designers used a variety of tools to visualize this exhibit. They drafted drawings, built scale models, and created 3D renderings. Each of these different methods of visualization offered unique benefits. The images below illustrate how OEC designers explored the look, feel, and experience of Hometown Teams.

Drawing is the designer’s standby. It is a traditional method, and frequently the quickest to execute. Designers can sketch out ideas, place text, images, and draft plans, elevations, and perspectives.

791110_HTT_EX_01_03_PYLON_B

This drawing is an example of the graphic design and structural elements of one section of Hometown Teams.

Sometimes a two-dimensional drawing can’t capture how various elements of the exhibition relate to one another. Designers build scale models to add that third dimension and physicality. These models help designers and curators work together to refine exhibition flow and content.

IMG_0036

This model is an early design of the pylons used in the show.

An updated version of the scale model is the 3D rendering. Digital models offer designers, clients, and visitors the added advantage of being able to easily view the exhibit from multiple perspectives. Designers can also create fly through animations to give the visitor the feeling of moving through an exhibition.


This animation moves the viewer through the entire exhibition.

Building a Better Exhibit Case

The Office of Exhibits Central and the Museum Conservation Institute develop affordable and sustainable conservation-grade casework.

OEC collaborated with MCI to design and test exhibit cases that meet the stringent requirements of object conservators to keep Smithsonian artifacts safe from environmental damage and material degradation.

Previously, Smithsonian museums had to contract this kind of specialized work out to one of a handful of manufacturers. The cost of these cases was almost always prohibitive, especially for temporary exhibits. The new high-level conservation-grade casework can be produced at a reasonable cost in-house at OEC.

Mindful of the Smithsonian’s commitment to sustainability, the system encourages recycling. Existing exhibition cases can be retrofitted with conservation-grade object chambers. The cases also address both security concerns and fire safety.

The process and construction technique are the result of years of effort by staff members at both OEC and MCI. Conservator Jia-Sun Tsang tested a wide range of products to determine the best conservation-grade materials to construct the case. OEC provided the engineering, equipment, and fabrication expertise.


microchamber, or sealed object chamber

Illustration of object chamber, desk, and vitrine. The sealed object chamber, called a “microchamber,” isolates a museum object from harmful gases and other materials and maintains a stable humidity.


Microchamber fitted into exhiition case

Microchamber fitted into exhibition case.


Helmet in conservation grade case

This microchamber with deck was retrofitted to an ex¬isting wooden case. A set of metal coupons (back right corner)—used to monitor conditions inside the case—showed no corrosion after nine months. Photo: Don Hurlbert, NMNH.


Cyprus: Crossroads of Civilizations

Wooden display cases retrofitted with conservation-grade microchambers for the exhibition “Cyprus: Crossroads of Civilizations” at the Smithsonian’s National Museum of Natural History, 2010–2011. Photo: Don Hurlbert, NMNH.

For more information about conservation-grade cases, click below to download: “Conservation Meets Sustainability: Recycling Wooden Exhibition Cases.” WAAC Newsletter, Volume 35, Number 2, May 2013

Download Conservation Meets Sustainability

OEC at the Staff Picnic in Rain and Shine

Undeterred by intermittent showers, OEC staff shared their work with the greater Smithsonian
community. It was a chance to connect with other exhibit and museum
professionals. Even the Secretary stopped by to say hi.


SI picnic Image 1

The OEC Model Shop showcased the ability of its 3D scanning and printing technology with a range of
3D-printed models.


SI picnic Image 2

OEC brought an assortment of low-tech interactive exhibits to talk about exhibition design and fabrication. The mailbox in the foreground allowed visitors to read historic postcards for the exhibit Mail Call.


SI picnic Image 3

The OEC Graphics Shop featured the capabilities of its direct-to-surface printer, which can print on a wide variety of substrates, including acrylic, metal, corrugated plastic, MDF panel, and seat cushion (all pictured).


SI picnic Image 4

Jia-Sun Tsang, of the Smithsonian’s Museum Conservation Institute, discusses the green conservation-grade exhibit cases that were developed in partnership with OEC.


Secretary Clough Comes to OEC

Secretary Wayne Clough paid a visit to OEC last week to view the production process of the latest Museum on Main Street exhibit: The Way We Worked.  The exhibit was developed by MoMS and is based on a collection of photographs from the National Archives. The Way We Worked takes a close look at the important role work plays in American lives and how our workforce has changed over time.  Five copies of the exhibit were produced at OEC and began shipping out to small towns across America at the end of August.

Being from a small town himself, the Secretary spoke about how important cultural programing like traveling exhibitions are for rural Americans. He also mentioned how impressed he was with OEC’s handiwork. It was a pleasure to share our work with the Secretary and an exciting way to wrap up the production of another terrific MoMS exhibit. 

IMG_1701

Robbie Davis of MoMS assembles TWWW in preparation for the Secretary's visit. 
 
IMG_1709

Secretary Clough viewing TWWW.

IMG_1812

Secretary Clough poses for a photo at the entrance of TWWW.

IMG_1789

Secretary Clough talking with modelmakers Jon Zastrow and Danny Feilding about the fabrication process of TWWW. 

Office of the Chief Information Officer wall mural

A computer-rendered image of the Smithsonian Castle is the centerpiece of a coloful new wall mural at the main entrance to OCIO's offices in Herndon, Virginia.  A recent collaboration between the Office of Exhibits Central (OEC) and the Office of the Chief Information Officer (OCIO), the design consists of a 4' x 8' silhouette of the Castle made up of small "0's" and "1's" representing binary computer code, which is mounted to the entryway wall.  Beneath the Castle are two rows of images of the many Smithsonian buildings, emphasizing the fact that OCIO works with all of the museums and bureaus of the Institution.

The production of the Castle silhouette was an especially interesting part of the project.  "The "0's" and "1's" were computer-cut into a very large piece of pressure-sensitive vinyl in the Graphics Shop at OEC.   All of the vinyl surrounding the characters was then removed, leaving only the "0's" and "1's" on the vinyl's backing sheet, in the shape of the Castle.  A large piece of release-tape, which was the same size as the backing sheet and coated with strong adhesive, was pressed onto the "0's" and "1's", which transferred the adhesive from the tape onto the backs of the characters.  This sandwich–comprised of release-tape, vinyl, and backing sheet–was then delivered to OCIO for installation.

OCIO 6-7-09

Design drawing for the entrance exhibit for the Office of the Chief Information Officer (OCIO) 


In order to ensure that the Castle silhouette would be applied to a smooth surface, OEC's painter, Walter Skinner, first primed and painted the entryway wall at OCIO.  Next, OEC's Graphics Specialists, Rolando Mayen and Theresa Keefe–who designed the exhibit–carefully applied the vinyl.  They temporarily hinged the backing sheet to the wall exactly where they wanted the Castle silhouette to be positioned.  They removed the protective layer on the release-tape, which exposed the adhesive that had been transferred to the backs of the characters, and firmly pressed the "0's" and "1's" onto the wall to ensure that the characters were securely mounted.  Lastly, they removed the backing sheet, revealing the silhouette.

Once that was completed, Mayen and Keefe installed the two rows of images of the Smithsonian buildings, each of which is face-mounted to a piece of Plexiglas.  Finally, they applied the Smithsonian sunburst, and the name of the office in large vinyl letters, on the wall to the upper left of the Castle.

According to OEC's installation team, it was very exciting and gratifying to watch the two-dimensional design drawing come to life as it was being installed.  The muted Castle silhouette is balanced by the vibrant images of the Institution's buildings, and the exhibit, itself, is a clear representation of the rich diversity that makes up the Smithsonian.

“Page Turners” in Paper Engineering: Fold, Pull, Pop, and Turn

Pop-Up mechanisms–which allow certain elements to pop up from the surface of a book page–are just some of the paper construction types highlighted in the Smithsonian Institution Libraries' (SIL) exhibit, "Paper Engineering: Fold, Pull, Pop, and Turn," on view in SIL's gallery at the National Museum of American History (NMAH).  The exhibit, described on the Office of Exhibits Central's (OEC) website in June 2010, includes 44 books that range in date from the mid-16th to the early 21st centuries, creating an intriguing retrospective of volumes, which were designed and constructed with parts that move.

Selected by Stephen Van Dyk, the exhibition curator and Librarian at the Cooper-Hewitt National Design Museum in New York, the books are divided into four primary categories according to each one's paper construction type, as well as the mechanisms employed.  The groups consist of Movables; Pop-Ups; Folding Mechanisms; and Fantastic forms or "Multiple Constructions."  Examples of mechanisms contained in two of these categories–Pop-Ups and Multiple Constructions–can be activated by visitors to the gallery thanks to a clever page-turning device, loaned to the Libraries by Ann Montanaro, President of the Movable Book Society.  Originally constructed by Waldo Hunt, publisher and founder of InterVisual Books, it was used as a prototype by OEC's model shop to construct the page turners that are on display in the exhibit.  Wow! The Pop-Up Book of Sports and The Pop-Up Book of Phobias, donated to the exhibition by Susan R. Frampton, are connected to the devices, and allow viewers to see the paper engineering mechanisms at work, at the push of a button.

MB case cropped

The exhibit's page-turning devices are activated by push buttons


A windshield wiper-like arm has a small fork at the end which captures the page and holds it in place.  The arm is connected to a low-powered synchronous timing motor that is concealed inside the pedestal on which the device sits, which moves the arm back and forth; as the arm moves, the page follows along with it.  By the time the arm has completed its trip from right to left, the previous page has been turned, and a new page has been revealed; the arm then moves in the opposite direction so that the previous page is visible once more.  The cycle is slow enough that visitors can watch the book's moving parts with ease, as they open and close.

MB books closed cropped


MB books halfway cropped 1281


MB books open cropped

Wow!: The Pop-Up Book of Sports on the left,
and The Pop-Up Book of Phobias on the right, are connected to the
page-turning devices

"From studying the Libraries' page turner, I had a good idea of how I wanted to construct the device for the 'Paper Engineering' exhibit," said OEC model maker Jon Zastrow.  "A low voltage push button activates a relay, and turns the 120V timing motor to the 'on' position.  The page turner arm swings through its cycle.  A micro switch opens the circuit, turning off the motor each time the arm reaches its 'home' position, until the button is pushed again, thereby conserving energy."  The fabric-covered pedestal on which the page turner sits, has a slot cut into it to provide a free range of motion for the device's arm as it moves back and forth.  The device, itself, is constructed of molded plexiglas which serves as a book cradle.

MB people

Visitors to the gallery watch the page-turning devices in action


The exacting design and engineering of the various book elements, allow authors to create an infinite number of variations–at all levels of complexity–which work together successfully.  The page turners help viewers see how the mechanisms function, and how the various elements connect to one another.  Due to the great popularity of "Paper Engineering: Fold, Pull, Pop, and Turn," the page turners have already completed thousands of revolutions.  They will, no doubt, continue to delight visitors for thousands more revolutions to come.

Background information on the books and collections is from Stephen Van Dyk, Library Director, at the Smithsonian's Cooper-Hewitt National Design Museum, New York.

Wow!: The Pop-Up Book of Sports by Sara Braunstein and Jennifer Altavilla, with paper engineering by Bruce Foster, was published by Time Books in 2009; The Pop-Up Book of Phobias by Gary Greenberg, with paper engineering by Matthew Reinhart, was published by Rob Weisbach Books in 1999.

Paper Engineering: Fold, Pull, Pop, and Turn exhibit installation


The fascinating art of paper engineering is the focus of a new exhibit that is on display in the Smithsonian Institution Libraries' (SIL) gallery at the National Museum of American History (NMAH).  "Paper Engineering: Fold, Pull, Pop, and Turn" includes 44 books that range in date from the mid-16th to the early 21st centuries, creating an intriguing retrospective of volumes, which were designed and constructed with parts that move.  Selected by Stephen Van Dyk, the exhibit curator at the Smithsonian's Cooper-Hewitt National Design Museum in New York, the books are divided into four primary categories according to each one's paper construction type, as well as the mechanisms employed.  The groups include Movables; Pop-Ups; Folding Mechanisms; and Fantastic Forms.  The Office of Exhibits Central (OEC) collaborated with the Libraries on the organization and production of the exhibit.

Movable Books 1 final

"Movables" include books with movable parts such as flaps; wheels or volvelles; and pull tabs


Movable Books 2 final

"Pop-Ups" are comprised of books that pop up from the surface of the page
 such as stage sets or pull-out layers; v-folds; box and cylinder
constructions; and floating layers


Movable Books 3 final

"Folding Mechanisms" consist of books that fold up such as carousels;
 tunnels or peep-shows; and leporellos


Movable Books 4 final

"Fantastic Forms" embrace those books which contain a combination of
construction types


Drawn mainly from the collections of the Cooper-Hewitt National Design Museum, and the Smithsonian's Dibner Library in Washington, D.C., the books demonstrate the changes that have taken place over time in paper engineering, as well as the continuing use and popularity of many of the oldest types of paper construction techniques.  According to Van Dyk, "Authors, designers, and paper engineers have employed diverse construction methods and mechanisms to create pop-up and movable books that have educated and entertained readers for more than 800 years.  In many cases, movable parts and pop-ups have been the most effective way to teach concepts such as alphabets and numbers to children, or to illustrate the human body by revealing the locations and positions of internal organs."


An example of the latter is included in the exhibit, and falls into the category of volumes known as "Movables."  De homine [On man] was printed by Petrus Leffen and Franciscus Mayardus in the Netherlands in 1662, based on the work of Rene Descartes (1596-1650), the French philosopher, mathematician, and scientist.  "Movables" which have parts that are superimposed or layered on the page, include three basic construction types: flaps; wheels or volvelles; and pull tabs.  De homine contains flaps–which were hinged on the surface of the page, and opened like a window, revealing an image below–that were used to illustrate the physiology of the heart.

Movable Books 5 final

"Movables" book: De homine [On man]


Another work in the "Movables" category is the Astronomicum Caesareum [The emperor's astronomy], the earliest book in the exhibit.  It was printed in Ingolstadt, Germany, in 1540, based on the work of Peter Apian (1495-1552), a German scholar who was famous for his writings on astronomy, mathematics, and cartography.  In the book, hand-decorated wheels or volvelles are used–paper disks which, when rotated, brought images and information into alignment–allowing the reader to chart the positions of the planets.

Movable Books 6 final

"Movables" book: Astronomicum Caesareum [The emperor's astronomy]
Book loan: Courtesy Mr. and Mrs. Robert Gordon and the Adler Planetarium, Chicago, Illinois


The second category of books in the exhibit, "Pop-Ups," have parts that are attached to the surface of the page which pop up when the page is opened.  "Pop-Ups" include four basic construction types: stage sets or pull-out layers;   v-folds; box and cylinder constructions; and floating layers.  The Elements of Geometrie of the Most Auncient Philosopher Euclide of Megara… is an excellent example of the category.  Printed in 1570 by J. Daye in London, based on the work of the ancient Greek mathematician Euclid, the book contains box and cylinder mechanisms, which were used to create pyramids and other geometric forms.

Movable Books 7 final.jpg.

"Pop-Ups" book: The Elements of Geometrie of the Most Auncient Philosopher
Euclide of Megara…


One of the most recent works in the exhibit, In the Beginning: The Art of Genesis, A Pop-Up Book, also falls into the "Pop-Ups" category.  Written and designed by Chuck Fischer with paper engineering by Bruce Foster, and printed by Little, Brown, New York, in 2008, floating layers were used to enhance the story line.

Movable Books 8 final

"Pop-Ups" book: In the Beginning: The Art of Genesis, A Pop-Up Book


The third category of books included in the exhibit, known as "Folding Mechanisms," fold and unfold in an accordion-like manner, and include three basic construction types: carousels; tunnels or peep shows; and leporellos.  The Sleeping Beauty, for example, is an exquisite carousel book, printed by L. van Leer in Amsterdam, ca. 1950, with illustrations by Roland Pym.  The hidden complexities of its carousel shape, when opened to a 360 degree circle, can be seen from above.

Movable Books 9 final

"Folding Mechanisms" book: The Sleeping Beauty


carousel

Aerial view of The Sleeping Beauty


In contrast, Van Dyk noted, "The tunnel book or peep-show, consisting of a series of illustrated cards edged with figures or scenery placed at a distance, one behind the other, creates the illusion of depth and perspective.  A notable example is a beautifully hand-colored peep show called Garden Scene, created by German engraver Martin Engelbrecht (1684-1756), who popularized these curious tunnel books in the 18th century."  Printed in Augsburg, Germany, ca. 1750, the book depicts an elegant dance scene set in a classical garden.

Movable Books 14 final

"Folding Mechanisms" book: Garden Scene


The fourth category of books included in the exhibit, "Fantastic Forms," incorporates multiple construction types, which range from traditional mechanisms to ever-changing new innovations.  Mega-Beasts by Robert Sabuda and Matthew Reinhart, printed by Candlewick Press, Cambridge, Massachusetts, in 2007, is one of many examples included in the exhibit.

Movable Books 12 final

"Fantastic Forms" book: Mega-Beasts


While the books are important as works of art, the design and engineering behind their construction is equally significant.  Ensuring that all of the parts that move can survive thousands of manipulations, and that all parts can be contained within the covers of the volume once it is closed, often involves complex planning and testing.  Additionally, the movable parts must successfully satisfy the design concepts that the author is hoping to convey.


Moreover, designing and constructing brackets to support the books while they are on exhibit is a considerable challenge.  OEC's plexi specialist, Richard Gould, worked closely with SIL's conservator, Vanessa Haight Smith, to design and fabricate mounts that would protect the books' fragile elements, while at the same time, allow the public to view the volumes as the authors intended them to be seen.  Bee: A Read-about, Fold-out, and Pop-up, by David Hawcock and Lee Montgomery, printed by Random House, New York, in 1994, for example, has folding layers which allow a full three-dimensional reconstruction of a honeybee's body and wings, when the book's covers are brought together back to back.  The book is supported by a plexi bracket that is attached to the rear wall of the exhibit case, which creates the appearance of the bee in flight.

Movable Books 13 final

"Folding Mechanisms" book: Bee: A Read-about, Fold-out, and Pop-up


A particularly interesting mounting solution was devised for the "Folding Mechanisms" tunnel book, Garden Scene, a detailed description of which is posted on SIL's website.  Following an extensive conservation treatment by Haight Smith to stabilize the book's condition, a slotted rectangular box was fabricated out of plexi, into which the individual leaves of the tunnel structure were inserted.  When looking at the book from the front, the full scene can be viewed, along with its magnificent perspective.  As one walks around the side of the case, however, the scene dissolves into its individual layers, and the author's engineering skills become apparent.

Movable Books 14 final

Front view of "Folding Mechanisms" book, Garden Scene

plexi 3-4

Three-quarter view of Garden Scene

plexi side

Side view of Garden Scene


As well as collaborating on the design and fabrication plans for the exhibit, OEC also worked with SIL on its installation.  While OEC staff placed decks, graphics, label bars, and brackets, Haight Smith carefully installed the books in their individual cases.

Movable Books 17 final

Vanessa Haight Smith installs the "Pop-Ups" book, Ricky the Rabbit, with
 illustrations by Vojtech Kubasta, printed by Bancroft in London, ca. 1961


Movable Books 18 final

Richard Gould attaches a plexi book mount to the back wall of an exhibit case


Movable Books 19 final

Gould and Stoy Popovich place a plexi vitrine on top of the "Fantastic Forms"
 case base using rubber suction cups


Movable Books 20 final

The completed "Fantastic Forms" case


Movable Books 21 final

Popovich installs a header above the gallery entrance


Movable Books 22 final

Kathleen Varnell and Rolando Mayen install entryway graphics


Movable Books 23 final

Varnell ensures that the graphic panel is straight by holding a level up to a line of type


In addition to the remarkable books that are on view, an equally compelling element of the exhibit is a video component developed by the Libraries.  One of the two films on continuous display in the gallery contains an enlightening interview with book author and designer, Chuck Fischer, and paper engineer, Bruce Foster, who describe the movable book design and construction process.  The second video is a collection of stop-action shots which, when strung together, demonstrate the way in which a number of the books included in the exhibit open and close, revealing the parts that move.  "Working with photographers Don Hurlbert and Jim DiLoreto in the National Museum of Natural History's (NMNH) Photo Services Department, on the stop-action videos was a great pleasure," said Susan Frampton, SIL's program coordinator.  "Setting up each shot took a great deal of time and care, but the result is spectacular.  The books truly look as if they are alive."


From their varied subject matter–scientific, theatrical, religious, historical–to their wide-ranging forms of construction–Movables, Pop-Ups, Folding Mechanisms, Fantastic Forms–the books included in "Paper Engineering: Fold, Pull, Pop, and Turn" are multi-dimensional works of art.  The exhibit captures the excitement and wonder, as well as the complexity and sometimes seemingly gravity-defying actions, of these captivating books.

Movable Books 24 final

"Fantastic Forms" book, titled One Red Dot: a Pop-Up Book for
Children of All Ages
, by David A. Carter, was printed in 2004, 
by Little Simon, New York


Background information on the books and collections is from Stephen Van Dyk, Library Director, at the Smithsonian's Cooper-Hewitt National Design Museum, New York.



Moving Beyond Earth

The Smithsonian's National Air and Space Museum (NASM) recently opened a new gallery devoted to exploring recent human spaceflight during the space station and space shuttle eras, as well as to contemplating future spaceflight possibilities.  "Moving Beyond Earth" includes artifacts such as space suits and astronaut gear; models including a 12' tall space shuttle replica; and interactive components that allow visitors to experience various aspects of spaceflight such as serving as mission control's flight director, equipping a module for use on the space station, manipulating and assembling space station elements, and exploring the Moon and Mars.

The Office of Exhibits Central (OEC) collaborated with the museum on one of the key components in the gallery–a presentation stage intended to be used for live events and broadcasts, as well as for the "Space Flight Academy" quiz game which tests visitors' flight readiness.  The stage was an exciting challenge for the OEC team, which took NASM's original design concept, and turned it into a three-dimensional structure.

MBE 1final CAD

CAD drawing prepared by OEC model makers, Vincent Rossi and Adam Metallo 


The first step in the production of the stage was for OEC model makers, Vincent Rossi and Adam Metallo, to create a drawing using Computer Assisted Design (CAD) software, which reflected the size and profile parameters that NASM had provided to the team.  Rossi, who served as OEC's project leader, explained the importance of the CAD drawings.  "I knew that everyone would be building from the drawings," he said, "and so I wanted to ensure that they were as accurate as possible.  The CAD drawings allowed for precision in all components.  We were working within a limited time-frame, with little room for error, and it was essential that each element was completed to an especially high standard.  Also, the CAD drawings allowed us to see how the finished structure would look inside the gallery."

Once the drawings were completed and approved by the museum, discussions took place to determine what types of materials would work best for the interior framework and outer skin of the stage.  Because it needed to support equipment, as well as people during live presentations, the stage had to pass stringent Smithsonian life/safety reviews, including receiving engineering and materials approvals from the review board.  Square 3/8" steel tubing was selected as the best material for the frame, since it was structurally sound, as well as relatively easy to work with. 

The team cut the steel–which came in 20' lengths–to the desired sizes with a band saw according to the CAD drawings, and carefully labeled the pieces so that they would know exactly where each custom-made segment belonged.  The steel tubing for the curved perimeter of the frame was sent to an outside contractor, who was able to bend it to the correct degree of curvature in order to get the round shape for the stage that was specified in the CAD drawings.  The OEC team then cut the curved tubing to size, as well, and labeled the pieces.

MBE 2 final frame at OEC

View of the steel framework at OEC


The CAD drawings called for the steel frame to be supported by fifteen posts, which were also custom made at OEC.  The posts were fitted with interior plates that could slide up and down threaded rods which were to be secured to the museum's floor.  The posts could be adjusted for height by moving the plates up or down the threaded rods, and clamping them with nuts; the rods, in essence, acted as adjustable stilts.  The several posts which supported the curved perimeter were also reinforced in their interiors with metal angles: in one post, the steel angle ran from the lower left corner to the upper right corner, and in the next post, the angle ran from the upper left corner to the lower right corner.

Because the stage was designed so that its outer skin would be made up of fixed panels, as well as movable panels that could swing open as doors, complex hinges had to be attached to four of the perimeter posts to accommodate the doors, which Rossi and Metallo developed and fabricated at OEC.  The doors were intended to provide access to the open storage space beneath the stage, as well as to the electrical components needed to power the stage's interactive and audio/visual equipment.

MBE 3 final hinge

Door hinge


In the meantime, OEC model maker, Jon Zastrow, created a full-size template out of medium density fiberboard (MDF) which was set up on the floor so that the team could use it as an outline onto which they could arrange all of the post and frame "puzzle pieces" in order to double check the accuracy of the cut list before welding began.  After the pieces were assembled in place, they were welded together in three sections so that the framework would be manageable to work with; the sections were then painted with a rust-colored primer to seal the metal surface.

Once the interior steel framework was underway, Rossi focused on the type of material that would work best for the outer skin of the stage, suggesting that fiberglass might be a good choice, with which NASM concurred.  He located a firm that was able to produce large-scale structures, and he and the project administrator, George Quist, worked with the company to finalize the details.  "The firm was able to mold to very tight tolerances," Quist noted, "which is exactly what we needed for the project." 

The company first created a full-scale mold based on the computer drawings; the mold was divided into eight panels, four of which (every other one) were designed to be the hinged doors.  Next, the firm delivered the mold to a specialist who began the casting process by covering the interior of the mold with a gel coat.  A chop gun was used to spray a fiberglass and fire-retardant resin mixture into the mold to reach a depth of 1/4".  Rectangular-shaped steel reinforcements (illustrated in green on the CAD drawing) were embedded into the fiberglass panels to increase their structural integrity, and to provide a point of attachment for the door hinges.  Lastly, silver-colored acrylic polyurethane was applied as a finish coat on the outside of the fiberglass, giving the stage's skin a space-age appearance.

The team requested that one of the finished fiberglass door panels be delivered to OEC, in advance, so that it could be tested before the others were cast, to make sure that it would accurately fit the steel frame, and that the hinges on the posts could be connected to the embedded metal reinforcements inside the fiberglass, as planned.  Once the posts, hinges, frame, and fiberglass panels were complete, all of the pieces were delivered to NASM for the assembly of the stage.

OEC model makers, Danny Fielding and Natalie Gallelli, started the installation by drilling small holes in the floor of the museum to accommodate the threaded rods on which the posts were to be affixed, and then slipped the posts onto their rods.  Since the floor of the museum was not level, a laser level was used to adjust the posts; Fielding and Gallelli moved the posts up or down the rods until they were positioned correctly.  (The laser level is a portable light source that emits multiple beams of light simultaneously which serve to mark a pre-set height.)  According to Fielding, "The individual pieces were so precisely cut and welded, that leveling the posts went very smoothly.  We spent a great deal of preparation time in the OEC shop measuring, prototyping, and testing so that we would not run into any complications on site.  Additionally, we assembled the entire structure at OEC to ensure that all of the components worked together as we had anticipated they would."

MBE 4 final frame at NASM

View of the steel framework installed in the exhibit gallery at NASM


A platform, constructed by Jon Zastrow of fire-rated, medium density fiberboard, was then bolted to the top of the metal frame by Fielding and Gallelli.  The next phase of the installation was to attach the fiberglass panels to the steel framework.  During the design phase, Rossi and Metallo had built in flexibility wherever there were unknowns.  "By factoring in a degree of adjustability," Metallo said, "we could account for variation or anything that came in above the anticipated tolerance level.  The door hinges, for example, were adjustable up to approximately 2", which allowed the doors to move up, down, left, or right, in any direction, so that we would be able to install them correctly."

MBE 5 final attaching wall 96

Vincent Rossi (left) and Adam Metallo (right) attach a fiberglass panel to the steel framework


MBE 6 final under platform 80

Adam Metallo (left) and Natalie Gallelli (right) adjust a post


Rossi and Metallo utilized laptops on site at NASM to access their CAD drawings, making the process virtually paperless.  It was unnecessary for them to print out full-scale blueprints at any point in the process, and Rossi was able to continually update the drawings, as adjustments were made in the design.

MBE 7 final team 29

Adam Metallo (left background) and Vincent Rossi (right background) consult the computer drawings while Natalie Gallelli (left foreground) and Danny Fielding (right foreground) adjust a post


MBE 8 final stage final

View of the assembled stage


For special events, NASM's original design concept called for accessories that could be used with the structure, including stairs and elevators.  Rossi was able to locate three companies that provided the needed equipment: the first firm, which specialized in building custom-made staircases, fabricated removable stairs for the project, equipped with a built-in handrail to allow visitors and staff to ascend the stage; the second, an elevator manufacturer, was able to construct an appropriately-sized lift that operated without flammable oils, and could be permanently attached to the stage to lift materials onto it; and the third was an elevator manufacturer that carried specially-designed equipment which met Americans with Disabilities Act (ADA) requirements, and provided a removable elevator to facilitate wheel-chair access.

The final phase of the installation was the attachment of the lighted interactives along the rim of the stage, which were prototyped and fabricated by OEC model maker, Chris Hollshwander, based on NASM's designs; NASM positioned and connected the electrical work.  Visitors can watch the outcome of their game playing on free-standing, large-screen monitors which sit on top of the stage when the structure is not being used for special events.  NASM then covered the MDF platform with carpeting, and special exhibit lighting was focused on the stage and the other exhibit components in this very dynamic gallery.

MBE 9 final heads 19

Danny Fielding (left) and Adam Metallo (right) check the rim of the stage where the interactive lights and buttons will be attached


In addition to the model shop team, OEC painter, Walter Skinner, detailer, Stoy Popovich, and graphic specialist, Theresa Keefe, contributed their expertise to the successful completion of the stage.  As project administrator, Quist, said, "It was quite exciting and gratifying to watch the structure evolve from the CAD drawings to a functioning stage.  The OEC model shop team solved a number of complex design and fabrication issues, and conducted a great deal of interesting materials research.  Moreover, the team was able to perfectly mesh what they fabricated in-house with the work produced by the many disparate outside contracters, including the cast fiberglass panels and doors for the outer skin, and the staircase and elevators.  The accuracy of all of the work was very impressive."

The OEC team credits NASM's chief of design, Frank Florentine, for helping to make the project a success.  His support throughout the design and fabrication phases was invaluable, and his commitment to quality ensured that "Moving Beyond Earth" will be one of the museum's most popular exhibit galleries.

MBE 10 gallery

View of the completed stage in "Moving Beyond Earth"


photo credits:

   photo 1:  Vincent Rossi and Adam Metallo

   photo 2:  Editor

   photo 3:  Adam Metallo

   photo 4:  Adam Metallo

   photo 5:  Courtesy NASM; Eric Long, photographer

   photo 6:  Courtesy NASM; Eric Long, photographer

   photo 7:  Courtesy NASM; Eric Long, photographer

   photo 8:  Editor

   photo 9:  Courtesy NASM; Eric Long, photographer

   photo 10: Editor


Journey Stories

The Smithsonian’s Museum on Main Street (MoMS) program recently completed the latest in a series of exhibits developed in collaboration with the Federation of State Humanities Councils.  MoMS–a division of the Smithsonian Institution Traveling Exhibition Service (SITES) which serves small town museums and residents of rural America–has added “Journey Stories” to its impressive list of exhibit offerings.  Curated by William Withuhn at the National Museum of American History (NMAH), “Journey Stories” examines the intersection between transportation and American society by providing individual stories which illustrate the critical roles that mobility and travel have played in our country’s history over time.  The MoMS staff worked with the Office of Exhibits Central (OEC) to design and fabricate five copies of the 600 square foot, free-standing exhibit, which began touring in May 2009.  Audio components; objects including clay jugs, courie shells, and hurricane lanterns; cut-out figures; and engaging graphics supplement the compelling text. 


The five copies of the exhibit will travel within the states of Illinois, Mississippi, North Dakota, Kansas, and Oklahoma during the first year of the tour.


A. Intro final


“Journey Stories” Title Panel


D. Pilgrims final


One Way Trip


J. Ax man final


Pushing the Boundaries


N. Wagon train final


Across the “Great Desert” to the West!


photo credit:


  OEC editor